
It's been six long months since the contractors packed up and left us with three new and empty rooms added on to our small home. They had completed the exterior shell, spray foam insulation, and roughed in the wiring for electrical and the plumbing for our future ensuite bath (more on that later)...but the rest was up to us! And y'all...I'm so excited to say that as daunting as the task seemed - the bedrooms are FINALLY finished! They've actually been finished for a few weeks now, and I kept thinking that I would get in there and take some better photos to post...but I've realized that just isn't going to happen. But I'm so stinking happy with how the kids' rooms turned out that I just want to share them with whoever cares to look! I spent so much time carefully planning and designing their rooms to be unique, fun, and functional with plenty of storage, room for guests, and also keeping the thought in mind that it might be an adjustment for them since they have shared a room their whole lives. (You can view the previous post about their shared room here.) Each kiddo did get to pick a theme and/or colors for me to use, but the overall design and plan was up to me. Then my patient husband and amazing sister helped me bring it to life! So keep in mind, everything you see was done over these last six months...in between my husband hunting turkey all spring and axis all summer...by little old us! We are by no means professionals...but I love to create pretty much anything...and I think we did a darn good job as DIYers.
So first up...here are some inspiration photos that gave me ideas on the design. I knew I wanted built ins with desks, shelves, and a window seat. And I loved the idea of built in bunks to make room for over night guests.


And here are a few pics of the starting point...the empty rooms filled with nothing but two by fours and a dream...


So we decided to build the built in bunk beds before starting the sheetrock. And maybe you noticed the opening in the "between" wall? Well that will serve as a pass thru between the two rooms and also function as the toy closet.


The kids even pitched in to help me out when daddy was working and I needed a few extra hands. :)


Next came the sheetrock...which I attempted to do by myself...and quickly realized it is not as easy as they make it look on those DIY shows. I did manage to finish almost one entire room before calling it quits and waiting for the hubby to get home.


Then the fun stuff really started happening! Judd began building the built ins I had designed while I figured out a fun decorative approach for Navey's ceiling. I had picked out some wall paper for Hank's ceiling, but Navey wanted her ceiling to be turquoise, so I wanted to add some dimension to it. Once we got it all up, it was time to caulk, putty, sand, and prime for paint!


Since both rooms are identical in design, just opposite of each other...you can guess that Hank's room looked the same as Navey's as we got ready to paint, so for now I will focus on Navey's room and the progress we made there start to finish before switching over to Hank's.
I have developed a fondness for Behr paint from Home Depot over the years, so Navey picked three main colors for her room: Pure Turquoise, High Maintenance (pink), and Lavender Sky. We decided earlier that she really liked her current bedding and we didn't see the need to change it since it was fairly new, so we made sure the colors matched well. I also knew I wanted it to be bright and white and full of light so I chose Whisper White as the base color. So the painting process began...and I can't thank my sister enough for helping me with all the different colors in all the different little areas.


I had found a wallpaper pattern I liked, but it was only one color, and Navey wanted all three colors on her walls, so I decided to hand paint the pattern and again my sister came through to help me with this project. We did wainscoting on the bottom portion of the wall using 1X4's, and painted the pattern on the upper portion.


By this point you can also see that we had installed the floors...Judd worked on this all day. We chose this Madeline Maple Luxury Vinyl Plank from Floor&Decor.


You can also see that we chose galvanized pipe for the bunk bed railings and ladders. I painted Navey's silver and Hank's black. Below the bunk bed, we designed the space to fit the IKEA Brimnes daybed perfectly. This allows the kids to have a top bunk for sleeping and a twin daybed to save floor space the majority of the time but that also easily converts into a king size bed for guests underneath.


One last quick before/after gallery before the final reveal. We have a matching chest of drawers and desk from Judd's mom that Navey had previously used in her nursery. We had painted the chest of drawers yellow and used the desk as her changing table, but I had never got around to painting it. She wanted something different for her new room and chose Lavender Sky for the Chest of Drawers and High Maintenance pink for the desk. I had also thrifted an old mirror for $5 that matched the desk perfectly and painted it to create her very own little makeup vanity. I don't have a before of the desk and mirror because they were in storage and I forgot to take one prior to painting, but they were basically a cherry oak stain color with the same brass pulls as seen on the yellow chest of drawers. I spray painted all of the pulls the same silver as her pipe railing and ladder.


Judd also built a rolling ladder on the other end of the bunks, so they have two ways to access the top, which you can see in the final photos, and behind it is the toy closet pass through into Hank's room. Another feature we added in both rooms is a floor to ceiling white board for the kiddos to draw on. It fits perfectly on the wall behind their doors where their full length mirrors are mounted. And you will also notice a small window slide on her upper bunk that allows her to raise it and see/speak to Hank if they get scared at night. So here is Navey's final reveal...a not TOO girlie girl's room...complete with unicorns, rainbows, and a stuffy jail. :)


And here are a few progress photos of Hank's room. He chose a Super Mario theme along with Behr's Belfast (green), Flirt Alert (red), and Cosmic Cobalt as his paint colors. We bought him the same IKEA Brimnes daybed but in the gray color, so I decided to match his base color to that and chose Behr's Asphalt Gray. We also made the now somewhat regretful decision to wall paper his ceiling in a fun gray/white geometrical pattern, found here at Amazon. I loved how it turned out, but man was that the hardest thing to do! We could've easily divorced over that task...it was TOUGH. I finally gave up on it being perfect...we could NOT get it to line up...but it's actually hard to tell unless you just really study it. If someone ever says they want you to help them wallpaper their ceiling...run the other way and run fast! It is the devil's work, I tell you! :(


And here is the before/after gallery of his desk and chest of drawers. The desk was my mom's and then mine when I was younger and the chest of drawers was built for Judd by his grandfather. The top is warped and we plan to replace it, but just didn't have time before moving the kids in. I decided I wanted the chest of drawers to resemble Mario's overalls and the desk to represent Luigi...hoping the new pulls would serve as a nod to both brothers' infamous mustaches. I am so pleased with how these turned out!


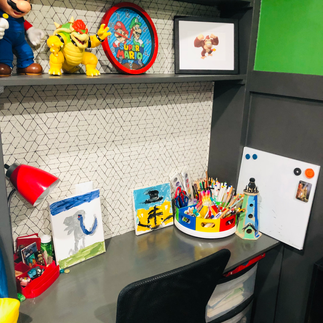
So here is Hank's final reveal - a Super Mario themed boy's room...complete with a Mario playhouse! :)


If you look closely...there are many flaws...as I said, we are NOT professionals! But it is so awesome to see my vision come to life! I have learned so much...the first thing being that I'm not quite the DIYer I hoped to be...but the end product made it all worth it. We do plan to put doors on each side of the toy closet eventually, but for now the kids like it being open and connected. And I think it's safe to say that they absolutely love their new rooms! Here are some photos from when we surprised them with a "soft" move in...when we had just enough done that they could see and know what the rooms would look like upon completion. We still have many more rooms to go so check back soon for more updates! :)


